
|
Pre-Production Process Samples are your last chance to catch problems before they become costly. A well-structured sample request is the most important step between selecting a supplier and placing a bulk order. It verifies material quality, color accuracy, logo execution, hinge function, lens clarity, and overall build — all before you commit to hundreds or thousands of units. This guide shows you exactly what to ask for, how to evaluate what you receive, and what communication to send to your factory to start the process. Send a Sample Request |
Sample Lead Time 7 - 10 working days (typical) |
|
Key principle: Sample quality represents the best the factory can produce under controlled conditions. If the sample has issues — uneven finishing, loose hinges, off-color logos, lens distortion — bulk production will not improve on it. Treat the sample as the quality ceiling for your order. |
A professional sample request gives the factory everything they need to produce an accurate pre-production sample. Missing information leads to delays, incorrect samples, and repeated rounds of revision. Send the following in your initial request:
|
Frame Design Reference |
Provide reference images with marked dimensions, desired frame shape, temple design, and bridge style. For OEM projects, include technical drawings or CAD files. For ODM, specify the exact catalog model number and any requested modifications. |
|
|
Material Specification |
Specify frame material (acetate, TR90, PC, metal, titanium, or hybrid), preferred acetate sheet supplier if relevant, lens material (TAC, PC, nylon, or glass), and any special material requirements such as bio-acetate or recycled content. |
|
|
Color and Finish Details |
Provide Pantone codes or physical color swatches for each frame color. Specify finish type: polished gloss, matte, tortoise pattern, transparent, or two-tone. Include temple tip color and any contrast details. For acetate, specify if you want custom color lamination. |
|
|
Logo and Branding |
Send your logo in vector format (AI, EPS, or CDR). Specify printing method: laser engraving, metal plaque, hot stamping, pad printing, or silk screen. Indicate exact placement: left temple exterior, right temple interior, lens etch, or bridge. Provide size specifications in millimeters. |
|
|
Lens Requirements |
Specify lens material, base tint color, UV400 requirement, polarized or non-polarized, mirror coating color if applicable, and any additional coatings (anti-scratch, anti-fog, hydrophobic). Note the target certification standards: FDA drop-ball for US, CE EN 1836 for EU. |
|
|
Packaging Preferences |
Indicate packaging type for the sample: standard case, custom box, pouch, cleaning cloth, and hang tag. If custom packaging requires separate sampling, ask the factory to clarify the packaging sample timeline separately from the frame sample timeline. |
When your samples arrive, inspect them systematically. Do not rely on a quick glance — each checkpoint matters for bulk production consistency.
|
Inspection Area |
What to Check |
Red Flag If |
|
Frame Finish |
Run fingers over all surfaces. Check for rough edges, uneven polish, inconsistent texture, visible seams, or scratches. Hold under bright light from multiple angles. |
Rough spots anywhere on the frame surface |
|
Hinge Function |
Open and close temples 20+ times. Check for smooth movement, consistent tension, and proper alignment when closed. Both temples should close symmetrically. |
Loose, gritty, or uneven hinge movement |
|
Logo Execution |
Check logo placement accuracy, depth consistency (for engraving), color accuracy, edge sharpness, and alignment. Measure logo position against your specification. |
Misaligned, blurry, or off-color logo |
|
Color Accuracy |
Compare against Pantone reference or original swatch under daylight (not office lighting). Check color consistency across different parts of the frame. |
Noticeable color deviation from reference |
|
Lens Quality |
Look through lenses against a white background. Check for distortion, bubbles, scratches, or uneven tint. Verify polarization by rotating against a known polarized lens or LCD screen. |
Visual distortion or tint unevenness |
|
Frame Alignment |
Place on a flat surface. Both temple tips and the frame front should contact the surface evenly. Check from the front that the frame is symmetrical — left and right sides should mirror each other. |
Frame rocks on flat surface or appears asymmetrical |
|
|
Common Sample Request MistakesRequesting only one sample per design Request at least 2-3 samples of each design in different colors. A single sample does not tell you enough about color consistency or production repeatability. Not providing vector logo files JPG or PNG logos cannot be used for engraving or precise color matching. Always send AI, EPS, or CDR vector files with outlined fonts and specified Pantone colors. Evaluating samples under one light source Inspect under daylight, indoor LED, and warm lighting. Color and finish can look different under each. Your customers will see the product in all conditions. Rushing the sample evaluation Take at least 2-3 days to evaluate. Wear the samples yourself. Let colleagues inspect them independently. Issues that are not obvious on day one often become apparent with use and multiple perspectives. |
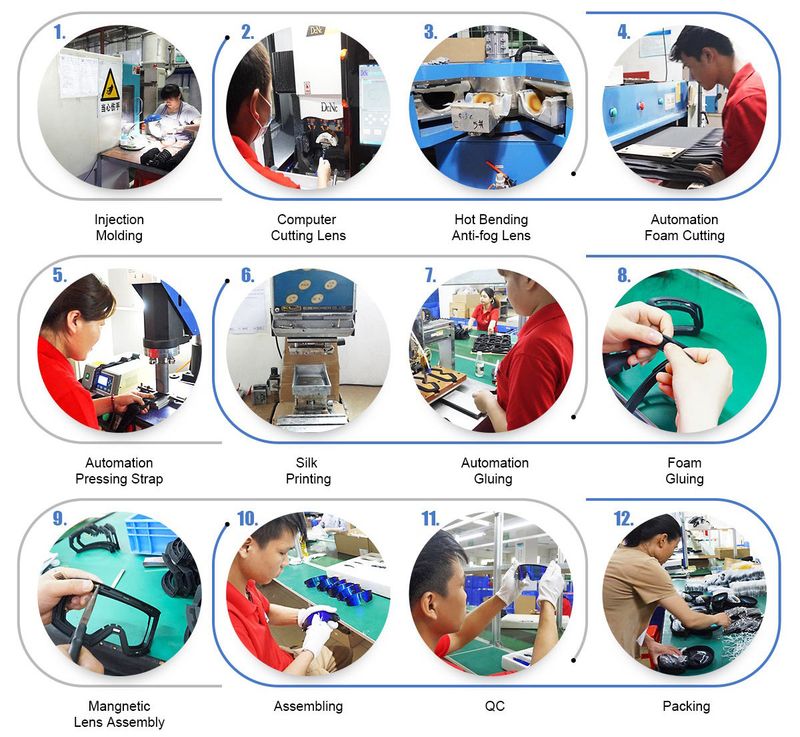
Factory QC station during sample inspection 
Frame and lens sample evaluation in progress |
|
|
||||
|
|
||||
|
|
Ready to Request Your First Samples?Send us your frame design references, material preferences, logo files, lens requirements, and target quantity range. We will confirm sample feasibility, timeline, and pricing within 1-2 business days. Submit Your Sample Request |


Please Read On, Stay Posted, Subscribe, And We Welcome You To Tell Us What You Think.


Copyright @ 2026 Xiamen Jings Eyewear Co., Ltd. All Rights Reserved.
 Network Supported